gRPC makes the specification and implementation of networked APIs a snap. But what is the simplest way to document a gRPC API? There seem to be some hosted providers by Google, e.g. SmartDocs, but I have yet to find a gRPC-specific tool. For REST API frameworks, documentation is commonly generated along with live examples using OpenAPI (formerly swagger). By using grpc-gateway it appears to be pretty straight forward to generate a REST/gRPC API combo from protocol buffers and then hook into the OpenAPI specification.
In this post, I’ll go through the creation of docs from gRPC protocol buffers. In a following post, I’ll go through the creation of a live gRPC/REST service with Swagger documentation.
Step 1: Define the service.
We’ll create a simple “notes” service that has two endpoints: create a note and fetch notes, optionally filtered.
syntax = "proto3";

package notes.v1;
option go_package = "github.com/bbengfort/notes/v1";


service NoteService {
    rpc Fetch(NoteFilter) returns (Notebook) {};
    rpc Create(Note) returns (Notebook) {};
}

message Note {
    uint64 id = 1;
    string timestamp = 2;
    string author = 3;
    string text = 4;
    bool private = 5;
}

message NoteFilter {
    repeated uint64 ids = 1;
    repeated string author = 2;
    string before = 3;
    string after = 4;
    bool private = 5;
}

message Notebook {
    Error error = 1;
    repeated Note notes = 2;
}

message Error {
    uint32 code = 1;
    string message = 2;
}
So far, this is just a gRPC service definition. If we’re working in a Go project, we can version our API and structure our project as follows:
Workspace/go/src/github.com/bbengfort/notes
└── cmd
|   └── notes
|   |   └── main.go
├── go.mod
├── go.sum
└── proto
|   └── notes
|   |   └── v1
|   |   |   └── api.proto
Using this directory structure, generate the struct code and server and client interfaces using protoc with go and grpc plugins:
$ protoc -I ./proto/ \
    --go_out=. --go_opt=module=github.com/bbengfort/notes \
    --go-grpc_out=. --go-grpc_opt=module=github.com/bbengfort/notes \
    proto/notes/v1/*.proto
NOTE: You’ll have to install
protoc(I did so withbrew) and the go and grpc plugins (I usedgo get). See the gRPC Go Quickstart for more information on the installation process.
In this command the -I flag specifies where protoc can look for included protocol buffer files (e.g. if they’re imported) - more on this later. The --go_out and --go-grpc_out flags specify where to write the generated go code and the --go_opt=module= and --go-grpc_out=module flags specify the root Go module. If you run this in the project root, e.g. github.com/bbengfort/notes then a v1 directory will be created with api.pb.go and api_grpc.pb.go inside of it. This is because of the option go_package = "github.com/bbengfort/notes/v1"; directive at the top of api.proto which resolves the output path based on all the module directives.
Step 2: download includes files and install dependencies
In order to use the grpc-gateway and openapiv2 protocol buffer plugins, we’ll have to modify our proto file with options that allow us to specify how the REST API is defined and to supply information to the swagger.json generated OpenAPI v2 specification. Custom options are described in third party protocol buffer files that must be included when we generate our protocol buffers using the -I flag.
NOTE: I believe there is a way to download and “install” third party libraries into a global includes path, e.g.
/usr/local/include/google/protobufbut I have to investigate this further.
To simplify the use of protoc and to prevent dependency management issues, I just downloaded the needed third-party from grpc-gateway-boilerplate. This appears to be a pattern in some of the repos I’ve seen, adding them to a third_party directory, though I prefer to add them to a include directory. Your directory should now look like:
Workspace/go/src/github.com/bbengfort/notes
└── cmd
|   └── notes
|   |   └── main.go
├── go.mod
├── go.sum
└── include
|   └── googleapis
|   |   ├── LICENSE
|   |   └── google
|   |   |   └── api
|   |   |   |   ├── annotations.proto
|   |   |   |   └── http.proto
|   |   |   └── rpc
|   |   |   |   ├── code.proto
|   |   |   |   ├── error_details.proto
|   |   |   |   └── status.proto
|   └── grpc-gateway
|   |   ├── LICENSE.txt
|   |   └── protoc-gen-openapiv2
|   |   |   └── options
|   |   |   |   ├── annotations.proto
|   |   |   |   └── openapiv2.proto
└── proto
|   └── notes
|   |   └── v1
|   |   |   └── api.proto
└── v1
|   ├── api.pb.go
|   └── api_grpc.pb.go
Finally install the required grpc-gateway plugins so that you have protoc-gen-grpc-gateway and protoc-gen-openapiv2 in your $GOBIN.
Step 3 (optional): tell vscode where includes are
If you’re using VSCode and the vscode-proto3 extension, then I like to add the following directives to my workspace settings (.vscode/settings.json):
{
    "protoc": {
        "path": "/usr/local/bin/protoc",
        "compile_on_save": false,
        "options": [
            "-I=${workspaceRoot}/proto",
            "-I=${workspaceRoot}/includes/googleapis",
            "-I=${workspaceRoot}/includes/grpc-gateway",
        ]
    }
}
This prevents import error messages in your protocol buffers and enables autocomplete.
Step 4: annotate our service
Finally, we’re to the part we’ve been waiting for - annotating our proto file with the REST and OpenAPI v2 options. At the beginning of api.proto add the following:
syntax = "proto3";

package notes.v1;
option go_package = "github.com/bbengfort/notes/v1";

import "google/api/annotations.proto";
import "protoc-gen-openapiv2/options/annotations.proto";

option (grpc.gateway.protoc_gen_openapiv2.options.openapiv2_swagger) = {
    info: {
        title: "Notes";
        version: "1.0";
        contact: {
            name: "bbengfort";
            url: "https://github.com/bbengfort/notes";
            email: "info@bengfort.com";
        };
        license: {
            name: "BSD 3-Clause License";
            url: "https://github.com/bbengfort/notes/LICENSE";
        };
    };

    schemes: HTTP;
    schemes: HTTPS;
    consumes: "application/json";
    produces: "application/json";
};
When the openapiv2 plugin generates a swagger.json file, the information in this option will be used to populate the info, schemes, consumes, and produces fields of the specificiation. This will both influence the information in the generated documentation as well as make it easier to create a live server.
Next we must update the service definition to map gRPC services to REST API calls:
service NoteService {
    rpc Fetch(NoteFilter) returns (Notebook) {
        option (google.api.http) = {
            get: "/api/v1/notes"
        };
    };
    rpc Create(Note) returns (Notebook) {
        option (google.api.http) = {
            post: "/api/v1/notes"
            body: "*"
        };
    };
}
These options specify that the Fetch RPC can be accessed with a GET request to /api/v1/notes and that the Create RPC uses POST to the same endpoint. Note that the body: "*" flag ensures that the request body is included in endpoint.
Step 5: generate swagger spec and serve
In the final step of this post, we’ll use the openapiv2 plugin to generate the swagger json specification and use the swagger-ui docker image to serve some static documentation.
protoc -I ./proto/ \
    -I include/googleapis -I include/grpc-gateway \
    --go_out=. --go_opt=module=github.com/bbengfort/notes \
    --go-grpc_out=. --go-grpc_opt=module=github.com/bbengfort/notes \
    --openapiv2_out ./openapiv2 --openapiv2_opt logtostderr=true \
    proto/notes/v1/*.proto
This protoc command has been updated to include the third party protocol buffer files and also adds the openapiv2 plugin, writing a specification file at openapiv2/notes/v1/api.swagger.json (note you may have to make the openapiv2 directory before running this command).
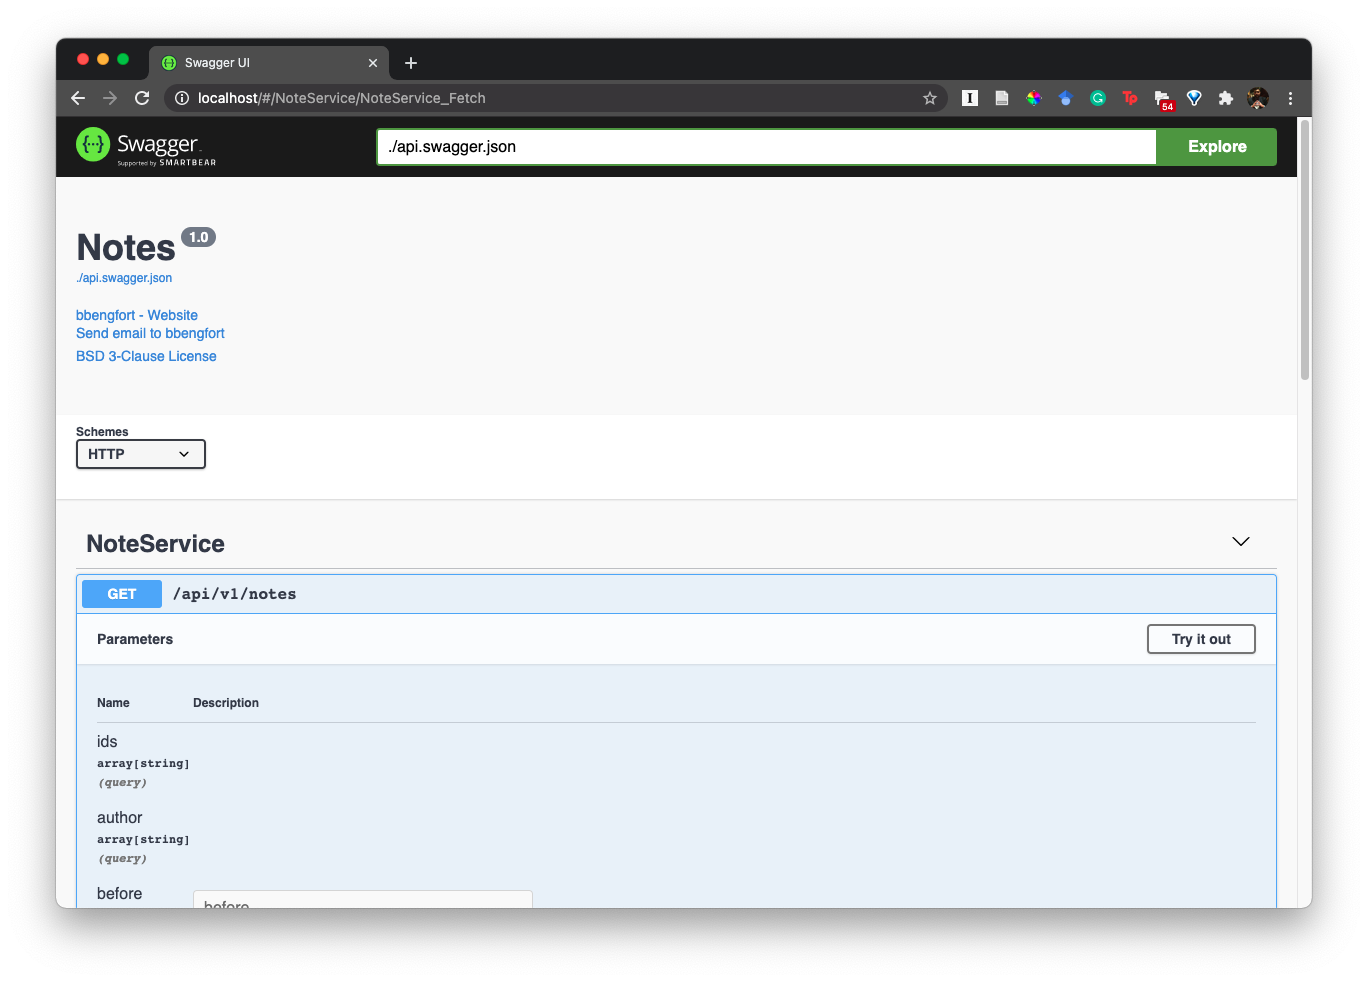
To serve the static swagger-ui docs, I used Docker as follows:
$ docker run -p 80:8080 \
    -e SWAGGER_JSON=/openapiv2/notes/v1/api.swagger.json \
    -v $PWD/openapiv2/:/openapiv2 \
    swaggerapi/swagger-ui
This will pull the swaggerapi/swagger-ui image from DockerHub when you run it for the first time. You can then view the docs at http://localhost/:
The next steps are to use grpc-gateway to create a server that does both gRPC hosting and a JSON REST API - complete with live Swagger documentation and styling.